Difference between revisions of "Equipment/Fine metalwork bench"
(→Fine Metalwork Bench) |
Marschalka (Talk | contribs) |
||
| (80 intermediate revisions by 6 users not shown) | |||
| Line 1: | Line 1: | ||
| − | + | {{RedTool}} | |
| − | This is a bench and hand tools for fine non-ferrous metalwork, e.g. for silver jewelry-scale making. We also have a [[ | + | [[Equipment|Equipment]] / Fine metalwork bench |
| + | |||
| + | <!--[[File:fine_metalwork_bench.jpg|thumb|460px|right]]--> | ||
| + | [[File:fine_metal_DSC_7694.jpg|thumb|460px|right]] | ||
| + | |||
| + | = Using the fine metalwork bench - General = | ||
| + | |||
| + | This is a bench and hand tools for fine non-ferrous metalwork, e.g. for silver jewelry-scale making. We also have a [[Equipment/Flexible_Shaft_Drill|Flexible Shaft Drill]] at the same bench. | ||
<span style="color:red">'''These are Category Red tools: induction is mandatory.'''</span> | <span style="color:red">'''These are Category Red tools: induction is mandatory.'''</span> | ||
| − | |||
| + | ==Owners== | ||
| + | |||
| + | Andy Mcdonald | ||
| + | Shiona Morrison | ||
| − | + | ==Trained== | |
| + | List held privately. | ||
== Health and Safety == | == Health and Safety == | ||
| Line 23: | Line 34: | ||
== Avoiding Tool Damage == | == Avoiding Tool Damage == | ||
| − | It is vital to avoid contamination of the tools for fine metalworking (on silver, copper, or titanium) with particles of iron, steel, or lead, otherwise pieces can be ruined when they are soldered. Accordingly, this bench and the fine metalworking tools must not be used on any materials except silver, copper, titanium, or gold: especially not for steel, iron, or lead. | + | It is vital to '''avoid contamination of the tools for fine metalworking''' (on silver, copper, or titanium) with particles of iron, steel, aluminium, or lead, otherwise pieces can be ruined when they are soldered. Accordingly, '''this bench and the fine metalworking tools must not be used on any materials except silver, copper, titanium, or gold''': especially not for steel, iron, aluminium, or lead. Some brass alloys are leaded; other brasses are ok. Wood and plastics are ok in moderation. |
| − | Some of the tools have polished or machined surfaces that are easily damaged, e.g. the planishing hammer, triblet, and bench block. These must not be used for hitting anything other than silver, copper, or titanium (especially, do not use the planishing hammer for hitting a punch, and take great care when hammering something on the triblet or bench block not to let the hammer come in contact with those). | + | Some of the tools have '''polished or machined surfaces that are easily damaged''', e.g. the planishing hammer, triblet, and bench block. These must not be used for hitting anything other than silver, copper, or titanium (especially, do not use the planishing hammer for hitting a punch, and take great care when hammering something on the triblet or bench block not to let the hammer come in contact with those). |
| − | It's important not to contaminate one grade of abrasive with another: particles of coarse abrasive on a fine polishing wheel can scratch a piece heavily. | + | It's important '''not to contaminate one grade of abrasive with another''': particles of coarse abrasive on a fine polishing wheel can scratch a piece heavily. |
All the fine metalworking tools must be put away in the right place (the correct drawer of the grey filing cabinet, as labelled) after use. | All the fine metalworking tools must be put away in the right place (the correct drawer of the grey filing cabinet, as labelled) after use. | ||
| Line 34: | Line 45: | ||
We keep a small amount of silver and copper stock for people to get started with (copper behaves a lot like silver, so is good for practicing). | We keep a small amount of silver and copper stock for people to get started with (copper behaves a lot like silver, so is good for practicing). | ||
| − | If you use any of the following, please (a) write in the | + | If you use any of the following, please '''(a)''' write in the |
fine-metalworking stock book the thing and the amount you've used, your name, and the cost, and | fine-metalworking stock book the thing and the amount you've used, your name, and the cost, and | ||
| − | (b) put the cost in the MakeSpace cashbox. If we're close to running out, please let the owners know. The prices below are designed to just break even, not make a profit. | + | '''(b)''' put the cost in the MakeSpace cashbox. If we're close to running out, please let the owners know. The prices below are designed to just break even, ''not'' make a profit. |
If you want to buy your own stock or tools, UK suppliers include Cookson [http://www.cooksongold.com/], Sutton Tools [http://www.suttontools.co.uk/] and HS Walsh [http://www.hswalsh.com]. It might well be worth clubbing together with other people to get volume discounts and share shipping. Copper and brass sheet can also be found at | If you want to buy your own stock or tools, UK suppliers include Cookson [http://www.cooksongold.com/], Sutton Tools [http://www.suttontools.co.uk/] and HS Walsh [http://www.hswalsh.com]. It might well be worth clubbing together with other people to get volume discounts and share shipping. Copper and brass sheet can also be found at | ||
Mackay's in Cambridge [http://www.mackay.co.uk/Metals-Warehouse.html]. | Mackay's in Cambridge [http://www.mackay.co.uk/Metals-Warehouse.html]. | ||
| − | + | For a table of stock see '''[[Equipment/Fine metalwork bench consumables]]''' | |
| − | + | ||
| − | + | ||
| − | + | ||
| − | + | ||
| − | + | ||
| − | + | ||
| − | + | ||
| − | + | ||
| − | + | ||
| − | + | ||
| − | + | ||
| − | + | ||
| − | + | ||
| − | + | ||
| − | + | ||
| − | == | + | =Tools= |
| − | + | ||
| − | + | ||
| − | + | ||
| − | + | ||
| − | == | + | ==Workholding== |
| + | * 4*Bench Peg And Anvil (these clamp on to a bench edge, to support work) [http://www.cooksongold.com/Jewellery-Tools/Bench-Peg-And-Anvil-prcode-999-082] | ||
| − | + | [[Image:fine_metalwork_bench_peg.jpg|300px]] | |
| − | + | ||
| − | + | * a joint cutter [http://www.suttontools.co.uk/hand-tools/joint-levelers-1/economy-joint-levelling-tool.html] (a V-block with a clamp to hold fine tube, an end stop and a slot for a saw blade, for making square cuts in fine tube) | |
| − | * | + | |
| − | + | ||
| − | + | ||
| − | + | ||
| − | + | ||
| − | + | ||
| − | + | ==Marking out== | |
| − | + | ||
| − | + | ||
| − | + | ||
| − | + | ||
| − | + | ||
| − | + | ||
| − | + | ||
| − | + | ||
| − | + | ||
| − | + | ||
| − | + | ||
| − | + | ||
| − | + | ||
| − | + | ||
| − | + | ||
| − | + | ||
| − | + | ||
| − | + | ||
| − | + | ||
| − | + | ||
| − | + | ||
* 150mm Ruler * 3 [http://www.axminster.co.uk/axminster-axminster-metric-stainless-rule-prod22753/] | * 150mm Ruler * 3 [http://www.axminster.co.uk/axminster-axminster-metric-stainless-rule-prod22753/] | ||
* Standard Steel Scriber [http://www.axminster.co.uk/axminster-axminster-basic-scriber-prod22757/] | * Standard Steel Scriber [http://www.axminster.co.uk/axminster-axminster-basic-scriber-prod22757/] | ||
* centre punch [http://www.axminster.co.uk/axminster-axminster-centre-punch-square-head-prod23024/] | * centre punch [http://www.axminster.co.uk/axminster-axminster-centre-punch-square-head-prod23024/] | ||
| − | * digital calipers [http://www.axminster.co.uk/axminster-axminster-digital-electronic-calipers-prod20296/] | + | * digital calipers (there are two calipers, a cheap axminster one [http://www.axminster.co.uk/axminster-axminster-digital-electronic-calipers-prod20296/] and a better quality one) |
* 3" square [http://www.cooksongold.com/Jewellery-Tools/3-Steel-Square-prcode-999-583&p=gs?gclid=CJKfvby477UCFcLHtAodMHIAyg] | * 3" square [http://www.cooksongold.com/Jewellery-Tools/3-Steel-Square-prcode-999-583&p=gs?gclid=CJKfvby477UCFcLHtAodMHIAyg] | ||
| − | + | [[Image:fine_metalwork_marking_out.jpg|300px]] | |
| + | |||
| + | ==Magnification== | ||
* Optivisor 2.0x No5 (NB: this is *not* eye protection) | * Optivisor 2.0x No5 (NB: this is *not* eye protection) | ||
| + | [[Image:Fine_metalwork_optivisor.jpg|300px]] | ||
| − | === | + | === How To: Optivisor=== |
| − | * | + | The Optivisor fits over your head (including over glasses if |
| − | * | + | necessary); the knob on the back controls how tight it is, and |
| − | * | + | those on the side control how tight the flip action is. |
| + | It is *not* eye protection - the lenses are just glass, so don't use this | ||
| + | when using the flexible shaft drill. | ||
| + | |||
| + | |||
| + | ==Files and saws== | ||
| + | * two 6"/150mm Flat Files, Cut 2 Vallorbe | ||
| + | * one 6"/150mm Half-round file, Cut 2 Vallorbe | ||
| + | * Set Of 12 Needle Files, 16cm - All Cut2 (one has to avoid contaminating silver with iron, so we'll want separate files for ferrous metals in addition to this) | ||
| + | * two Grobet/vallorbe Saw Frame Adjustable [http://www.cooksongold.com/Jewellery-Tools/Grobetvallorbe-Saw-Frame-Adjustable-prcode-999-73B] | ||
| + | * 6" Deep Adjustable Saw Frame [http://www.cooksongold.com/Jewellery-Tools/6-Deep-Adjustable-Saw-Frame-prcode-999-738]; | ||
| + | * Vallorbe Saw Blades Grade 2/0, Bundle Of 12*12 (£30.82); Vallorbe Saw Blades Grade 6/0, Bundle Of 12 (£3.70) (those saw blades are consumables - they break easily) | ||
| + | * Straight 7"/17.5cm Shears (£12.54) (for brutal cutting of sheet metal. It's usually preferable to use a saw instead, to leave a square edge without bending the metal) | ||
| + | [[Image:fine_metalwork_saws_and_files.jpg|300px]] | ||
| − | |||
| − | === Jeweller's Saws === | + | === How To: Jeweller's Saws === |
These should only be used on silver, copper, or titanium, *not on | These should only be used on silver, copper, or titanium, *not on | ||
| Line 126: | Line 106: | ||
finest). In general one wants a coarse blade for cutting thick metal | finest). In general one wants a coarse blade for cutting thick metal | ||
and a fine blade for cutting thin metal, and for tight curves. Fine | and a fine blade for cutting thin metal, and for tight curves. Fine | ||
| − | blades are also more fragile. Grade 2/0 is a normal (medium) blade, | + | blades are also more fragile. |
| − | with thickness 0.26mm, width 0.52mm, and 22 teeth per cm. The drill | + | * Grade 2/0 is a normal (medium) blade, with thickness 0.26mm, width 0.52mm, and 22 teeth per cm. The drill size for piercing is 0.55mm. These are ok for cutting metal from 0.5 to 1.0mm thick. |
| − | + | * Grade 6/0 is a rather fine blade, with thickness 0.18mm, width 0.35mm, and 32 teeth per cm. The drill size for piercing is 0.4mm. These are ok for cutting metal from 0.3mm to 0.5mm thick. | |
| − | to 1.0mm thick. Grade 6/0 is a rather fine blade, with thickness | + | |
| − | 0.18mm, width 0.35mm, and 32 teeth per cm. The drill | + | |
| − | is 0.4mm. These are ok for cutting metal from 0.3mm to 0.5mm thick. | + | |
The saw frames have adjustable length. To fit a blade, loosen the | The saw frames have adjustable length. To fit a blade, loosen the | ||
| Line 143: | Line 120: | ||
tension the frame so that the blade rings a little when plucked, and | tension the frame so that the blade rings a little when plucked, and | ||
tighten the associated knob - again, just finger-tight. | tighten the associated knob - again, just finger-tight. | ||
| + | |||
| + | [[Image:fine_metal_DSC_7677.jpg|600px]] | ||
| + | |||
To use the saw, first arrange the workpiece (with your cutting line | To use the saw, first arrange the workpiece (with your cutting line | ||
| Line 158: | Line 138: | ||
cuts on the down-stroke. You shouldn't need to push very hard at all, | cuts on the down-stroke. You shouldn't need to push very hard at all, | ||
either down or forwards. | either down or forwards. | ||
| + | |||
| + | [[Image:fine_metal_DSC_7676.jpg|300px]] | ||
If you need to cut around a sharp corner, remember to keep cutting, | If you need to cut around a sharp corner, remember to keep cutting, | ||
| Line 164: | Line 146: | ||
gently, otherwise the blade will break. | gently, otherwise the blade will break. | ||
| − | To start a cut in the middle of a sheet, you need to drill a | + | To start a cut in the middle of a sheet, you need to drill a clearance |
hold at least as big as the size above, depending which grade blade | hold at least as big as the size above, depending which grade blade | ||
you're using. Then thread the blade through the piece when fitting | you're using. Then thread the blade through the piece when fitting | ||
it. | it. | ||
| − | === Jeweller's Files === | + | === How To: Jeweller's Files === |
These should only be used on silver, copper, or titanium, *not on | These should only be used on silver, copper, or titanium, *not on | ||
| Line 175: | Line 157: | ||
permanently damaged by contamination when they are soldered. | permanently damaged by contamination when they are soldered. | ||
| − | There are needle files (cut 2) and a 6"/150mm Vallorbe | + | There are needle files (cut 2), two 6"/150mm Vallorbe Flat Files, and a 6"/150mm Vallorbe half-round file, also |
Cut 2. Files come in different finenesses; cut 2 is a medium | Cut 2. Files come in different finenesses; cut 2 is a medium | ||
general-purpose grade. | general-purpose grade. | ||
| − | + | ||
It's often useful to put the flat file on the bench, hold it in place, | It's often useful to put the flat file on the bench, hold it in place, | ||
| Line 188: | Line 170: | ||
careful not to push the tang of the file into the palm of your hand, | careful not to push the tang of the file into the palm of your hand, | ||
if the file suddenly becomes stuck on something. | if the file suddenly becomes stuck on something. | ||
| + | |||
| + | [[Image:fine_metal_DSC_7678.jpg|300px]] [[Image:fine_metal_DSC_7679.jpg|300px]] | ||
| + | |||
| + | Remember: files cut on the push stroke. On the left above, the file is being pushed (leftwards) along the metal. Dually, on the right above, the metal is being pushed rightwards along the file, towards the tang. | ||
Filing the edge of a piece of sheet square will usually leave a tiny | Filing the edge of a piece of sheet square will usually leave a tiny | ||
| Line 197: | Line 183: | ||
flat) and then smooth off. | flat) and then smooth off. | ||
| − | === Abrasive Papers === | + | === How To: Abrasive Papers === |
These should only be used on silver, copper, or titanium, *not on | These should only be used on silver, copper, or titanium, *not on | ||
| Line 212: | Line 198: | ||
it, or wrap it around a piece of wood or scrap metal. | it, or wrap it around a piece of wood or scrap metal. | ||
| − | === | + | ==Flexible shaft drill tools== |
| + | * Polishing Kit No 2 [http://www.cooksongold.com/Jewellery-Tools/Polishing-Kit-No-2-prcode-999-096E] | ||
| + | * Set Of 20 Drills 0.3-1.6mm (£15.96) (consumable) [http://www.cooksongold.com/Jewellery-Tools/Set-Of-20-Drills-0.3-1.6mm-prcode-999-CH5] | ||
| + | * diamond burrs (set of 30) (4.80) (consumable) [http://www.axminster.co.uk/axminster-diamond-30-piece-burr-set-prod21887/?searchfor=diamond%20burrs] | ||
| + | |||
| + | [[Image:flexible_shaft_tools.jpg|300px]] | ||
| + | |||
| + | ===How To: Changing Handpieces === | ||
| + | There are two handpieces: one with a chuck, for small drills, and one with a choice of two collets, for polishing tools and suchlike with standard-size shafts. | ||
| + | To remove a handpiece, just grasp in and the knurled black part of the flexible shaft and pull apart: | ||
| + | |||
| + | [[Image:fine_metal_DSC_7682.jpg|300px]] | ||
| + | |||
| + | To attach a handpiece to the shaft, look inside to see which way round the coupling is, turn it so that that matches the tab on the end of the flexible shaft, and push together. If it doesn't go, you may not have them precisely aligned enough. | ||
| + | |||
| + | [[Image:fine_metal_DSC_7680.jpg|300px]] [[Image:fine_metal_DSC_7681.jpg|300px]] | ||
| + | |||
| + | ===How To: Drilling Holes in Sheet Metal=== | ||
| + | |||
| + | First mark out exactly where you want the hole to be, with the scriber. Then support the sheet metal on the anvil of the bench peg or on the steel bench block (not on wood, otherwise the sheet will deform too much), position the tip of the centre punch exactly on the mark, and hit it gently with the clonking hammer (not the planishing hammer, otherwise the surface of that will be ruined!) to make an indentation. | ||
| + | |||
| + | [[Image:fine_metal_DSC_7686.rotated.jpg|180px]] | ||
| + | |||
| + | Now get the drill size you want (likely from the grey box on the counter on the right hand side of the secure workshop). You might have to clean it and to check its size with the calipers. Put it in the chuck and tighten with the chuck key. | ||
| + | |||
| + | [[Image:fine_metal_DSC_7683.jpg|300px]] | ||
| + | |||
| + | Put on eye protection, turn on the flexible shaft drill, and spin it up with the foot pedal to get a feel for it. Then support your metal on a scrap of sacrificial wood, locate the drill tip in the indentation, hold your metal to stop it rotating, and gently spin up the drill and push. How much speed and pressure to use is a matter of experience. | ||
| + | |||
| + | [[Image:fine_metal_DSC_7687.jpg|300px]] | ||
| + | |||
| + | ===How To: Change collets and fix tools into the collet handpiece=== | ||
| + | |||
| + | The collet handpiece has two collets, small split metal pieces with holes of particular diameters to suit burrs and wheels with 2.4 or 3.2mm shafts. They are held in by a small black threaded cone - to remove that, stop the handpiece rotating by putting the black pin through the hole in the handpiece side (you might need to rotate it to get the holes to line up) and use the little black spanner on the cone. It should be finger-tight, not tightened with all your force. Then you can change collets and refit the cone. | ||
| + | |||
| + | [[Image:fine_metal_DSC_7684.jpg|300px]] | ||
| + | |||
| + | To fix a tool into the handpiece (assuming the right sized collet is in place already), just loosen the black cone a bit, put the tool in, and tighten. | ||
| + | |||
| + | [[Image:fine_metal_DSC_7685.jpg|300px]] | ||
| + | |||
| + | ===How To: Polishing=== | ||
TODO | TODO | ||
| − | === Making Jump Rings === | + | ==Hammering== |
| + | * Flat Stake (this is a small anvil with a machined-smooth surface on all sides) [http://www.cooksongold.com/Jewellery-Tools/Flat-Stake---10cm-X-10cm-prcode-999-795] | ||
| + | * Round triblet (for forming rings and suchlike) [http://www.cooksongold.com/Jewellery-Tools/Round-1640cm-Steel-Triblet-prcode-999-820] | ||
| + | * Planishing Hammer (a polished-surface hammer for surface finishing and work-hardening) [http://www.cooksongold.com/Jewellery-Tools/Planishing-Hammer-Cookson-Value-Range-prcode-997-3111] (don't hit steel things such as punches with this) | ||
| + | * Rawhide mallet [http://www.cooksongold.com/Jewellery-Tools/Rawhide-Mallet-Size-2-1-Head-Diameter-prcode-999-603] (for hitting things without marking the surface) | ||
| + | * Generic ball-pean hammer, labelled `clonking hammer' (a non-polished hammer for hitting punches etc.) | ||
| + | |||
| + | |||
| + | [[Image:fine_metalwork_hammers.jpg|300px]] | ||
| + | |||
| + | |||
| + | Both the flat stake (or ''bench block'') and triblet have machined-smooth surfaces so that they don't mark any silver that one hits against them. To keep them smooth, it's important not to hit the stake or triblet directly with any steel tools. | ||
| + | |||
| + | |||
| + | === How To: using the triblet=== | ||
| + | The triblet (or ''mandrel'') is a long hard-steel cone, used to make rings circular. To use it, push a ring down the cone as far as it will go, then hit it all round with the rawhide mallet (pushing further down), trying to keep the face of the mallet (when it hits) parallel with the tangent plane of the cone. Doing this aggressively will also stretch the ring. | ||
| + | |||
| + | ==Pliers and tweezers== | ||
| + | * Assorted fine pliers: a Cookson 5 Piece,115mm Pliers Set (box-jointed with smooth jaws) | ||
| + | * Ring Bending Pliers, Cookson Value Range | ||
| + | * 5.5"/ 140mm Maun Flat Pliers Parallel Action [http://www.cooksongold.com/Jewellery-Tools/5.5-140mm-Maun-Flat-Pliers-Parallel-Action-prcode-999-644] | ||
| + | * Tweezer set [http://www.cooksongold.com/Jewellery-Tools/Workbench-Tweezer-Set-6-Pieces-prcode-999-096N] (brass and plastic tweezers for pickle, reverse and third-hand tweezers for soldering, fine tweezers for manipulating tiny things) | ||
| + | |||
| + | [[Image:fine_metalwork_pliers.jpg|300px]] | ||
| + | |||
| + | ==Soldering== | ||
| + | * Hand Torch [http://www.cooksongold.com/Jewellery-Tools/Hand-Torch-Please-Note-Jewellers-Torch-Is-Supplied-Without-Gas-prcode-999-955] (for soldering or annealing small pieces, up to 10-20mm. We also have a larger torch with the glassworking kit) | ||
| + | * Magnesia Soldering Block [http://www.cooksongold.com/Jewellery-Tools/Magnesia-Soldering-Block-prcode-999-974] | ||
| + | * Soldering Sheet 300mm X 300mm X 9mm [http://www.cooksongold.com/Jewellery-Tools/Soldering-Sheet-300mm-X-300mm-X-9mm-Asbestos--Substitute-prcode-999-969] | ||
| + | * Picklean Safe Pickling Powder 150g [http://www.cooksongold.com/Precious-Metal-Clay/Picklean-Safe-Pickling-Powder-150g-prcode-855-1060] | ||
| + | * crock pot for keeping pickle warm | ||
| + | * hard silver solder paste (£33.61) [http://www.cooksongold.com/Solders/Hard-Silver-Solder-Paste-30g-Syringe-prcode-PAT-075] (consumable) (this is great for small-scale work; for bigger things one wants strip solder and flux) | ||
| + | * solid strip solder in hard, medium, and easy grades (melt ranges 745-778°C, 720-765°C, 705-723°C) | ||
| + | * liquid flux [http://www.cooksongold.com/Jewellery-Tools/Auflux-Soldering-Fluid-250ml-Uc-prcode-998-108] (kept in the small metal cupboard in the workshop) and a flux brush | ||
| + | |||
| + | <!--[[Image:fine_metalwork_soldering.jpg|300px]] --> | ||
| + | [[Image:fine_metal_DSC_7691.jpg|300px]] | ||
| + | [[Image:fine_metalwork_pickle_pot.jpg|300px]] | ||
| + | |||
| + | === How To: Using the small gas torch === | ||
| + | |||
| + | The torch is kept in the flammables cupboard in the secure workshop. To light it, open the valve on the back and push the piezo button. To turn it off, close that valve firmly (not using your full strength, though). If the torch doesn't have enough gas in, you'll need to turn it off and recharge it from the canister of lighter gas (also kept in that cupboard), by (1) going outside, (2) turning the torch and canister upside down, (3) pushing the small red tube from the canister against the valve on the bottom of the torch, and (4) letting some gas flow in. | ||
| + | |||
| + | [[Image:fine_metal_DSC_7689.rotated.jpg|180px]] | ||
| + | |||
| + | === How To: Annealing === | ||
| + | |||
| + | Silver and copper (and many other metals) *work-harden*: if the metal is deformed, e.g. by bending or hammering, it gets harder (and more brittle). To soften it again it can be *annealed*: warmed up to let the crystals grow. For copper and silver, it suffices to warm them up to the point at which they just glow (in fact, that's hotter than necessary, but usually this isn't a problem). They don't need to be held at that temperature for any significant time, and they can either be left to cool naturally or dunked in water | ||
| + | (this is simpler than steel annealing). After annealing you may need to remove any firescale, by abrasives or pickling. | ||
| + | |||
| + | === How To: Soldering === | ||
| + | |||
| + | Silver soldering can be used to create a strong join between two metal surfaces - normally silver, but it can also be used for joining copper, brass, and even steel (though the pickling for steel will be different). For silver, it should be possible to make an essentially invisible join. | ||
| + | |||
| + | Silver solders are high-melting-point alloys; the solder paste we have in Makespace is a silver/copper/zinc alloy with a melting point of 770 C (usually attained with a gas torch). They are not to be confused with the lead-based solders used for electronics, which have melting points less than 200 C (usually applied with a soldering iron) and do not produce a mechanically strong joint. In addition to that, they contain lead, which will contaminate your piece. | ||
| + | |||
| + | To make a good solder joint, good preparation is essential. Molten solder is very runny: it flows freely over the surface of clean metal and flows into a hot joint by capillary action, but it is very bad at filling gaps (it's not like a glue or cement). Hence, the two bits of metal to be joined have to be shaped to fit precisely, ideally with no visible gap (less than 0.1mm, perhaps) between them. They also have to be clean, with no oxide layer or grease. Freshly cut or filed silver is fine. | ||
| + | |||
| + | To keep the metal clean while it gets up to temperature, and to help the solder run, one also needs a flux. The silver solder we have is in paste form, pre-mixed with a flux, which is convenient for making small solder joints (e.g. joining the ends of a ring, attaching earring parts, or making little loops ("jump rings"). For bigger pieces one usually uses snippets of solder sheet and a separate flux (which we also have). | ||
| + | |||
| + | So: | ||
| + | * Prepare the two surfaces to be joined, filing and using abrasive papers as necessary to make them clean and smooth in tight contact. | ||
| + | * Make a clear space on the hot-working bench (the stainless steel one) with the insulated block on the 30cm square flameproof sheet. | ||
| + | * Make sure you've got water to hand (e.g. in the steel pot) and the pickle ready if you're going to use it. | ||
| + | * Find the small gas torch (see above). For larger pieces you'll need the bigger propane torch. | ||
| + | * Arrange things so that the pieces will be held in contact while you heat them up. Sometimes they can just be resting next to or on top of one another (on the insulated block); sometimes a piece can be bent to hold the two surfaces in contact (e.g. for a ring); sometimes it's useful to hold one in the reverse-action tweezers (attached to a third-hand base) in contact with the other resting on the block; sometimes one needs iron binding wire and more ingenuity. | ||
| + | * Disassemble your arrangement to apply some solder paste. This is in a syringe - it's very stiff, so you'll need to push (but pull back on the plunger when you've got enough, otherwise it will keep going). You only need a little bit (e.g. a line for a ring, or a 1mm cube for a jumpring). Alternatively use solder strip. | ||
| + | * Warm your piece up with the torch. You want to get it quickly up to temperature, otherwise the flux will all burn off too early. And you need all the metal to be hot - focus the flame first on the bulk of the piece, not on your joint (solder likes to flow towards hot). The hottest part of the flame is just in front of the blue cone. | ||
| + | [[Image:fine_metal_DSC_7690.jpg|300px]] | ||
| + | * Watch the joint carefully (taking care not to burn yourself, point the torch at anything flammable, or inhale the fumes). When it's hot enough (a glowing orange) and the solder melts, you should see a flash of the molten silver flowing. Keep the flame there for just a moment (1s?) longer, then take it away. | ||
| + | * In most cases, it is not recommended to reheat if solder did not flow- oxide layer is formed on the surface and it will reduce the chance of solder sticking to metal. Exception may apply if you use ceramic flux (the expensive one). | ||
| + | * Let the piece cool either in the air or by picking it up with tweezers or pliers (but not the fine pliers!) and dunking it in water (watch out for splutters). | ||
| + | * Pickle it or use abrasives to remove any firescale. | ||
| + | |||
| + | === How To: Making Jump Rings === | ||
TODO | TODO | ||
| − | === Planishing === | + | === How To: Planishing === |
TODO | TODO | ||
| − | === Using the Ring Mandrel === | + | === How To: Using the Ring Mandrel === |
TODO | TODO | ||
| + | |||
| + | = To do = | ||
| + | * get one or two adjustable desk lamps, perhaps with magnifier | ||
| + | * get another file, either another 6"/150mm Flat File, Cut 2 Vallorbe or a similar half-round | ||
| + | * get a joint cutter, either [http://www.cooksongold.com/Jewellery-Tools/Special-Joint-Filing-Tool---Chenier-Cutter-prcode-999-597] £58 from cookson or a cheap one [http://www.suttontools.co.uk/hand-tools/joint-levelers-1/economy-joint-levelling-tool.html] £15 from Sutton Tools. | ||
| + | * get some dividers | ||
| + | * raise the bench somewhat and fix to the wall | ||
| + | |||
| + | |||
| + | |||
| + | = Gallery = | ||
| + | |||
| + | Please do add pictures of anything made using the fine metalwork tools. Here are some practice pieces from a training session (2013-05-12, AH, HW, S.): | ||
| + | |||
| + | [[Image:gallery1.jpg|300px]] [[Image:gallery2.jpg|300px]] | ||
| + | |||
| + | and some oxidised-silver tentacles (this is about 25x28mm): | ||
| + | |||
| + | [[Image:gallery3.jpg|300px]] | ||
Latest revision as of 15:07, 8 May 2022
Class Red equipment: Do not use without specific training.
(More about equipment classes)
Contents
Using the fine metalwork bench - General
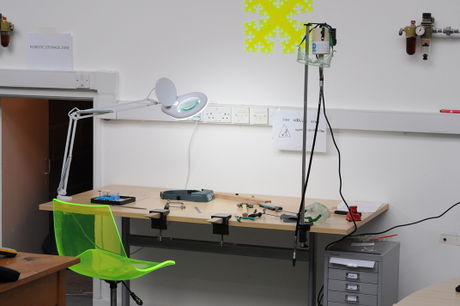
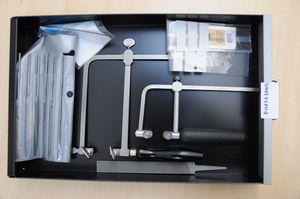
This is a bench and hand tools for fine non-ferrous metalwork, e.g. for silver jewelry-scale making. We also have a Flexible Shaft Drill at the same bench.
These are Category Red tools: induction is mandatory.
Owners
Andy Mcdonald Shiona Morrison
Trained
List held privately.
Health and Safety
Formal Risk Assessment: Fine Metalwork Hand Tools and Silver Soldering
The gas torch and gas canisters (standard lighter gas) should be kept in the flammable stock cupboard in the workshop when not in use.
The gas torch should only be refilled in the open air, as there can be gas leakage in the process. It should only be used at the hot-working bench above the insulated sheet.
The pickle is a mild corrosive, and hot items should not be dropped directly into it or else there may be splashes that could cause eye damage. The pickle should not be warmed except in use.
Avoiding Tool Damage
It is vital to avoid contamination of the tools for fine metalworking (on silver, copper, or titanium) with particles of iron, steel, aluminium, or lead, otherwise pieces can be ruined when they are soldered. Accordingly, this bench and the fine metalworking tools must not be used on any materials except silver, copper, titanium, or gold: especially not for steel, iron, aluminium, or lead. Some brass alloys are leaded; other brasses are ok. Wood and plastics are ok in moderation.
Some of the tools have polished or machined surfaces that are easily damaged, e.g. the planishing hammer, triblet, and bench block. These must not be used for hitting anything other than silver, copper, or titanium (especially, do not use the planishing hammer for hitting a punch, and take great care when hammering something on the triblet or bench block not to let the hammer come in contact with those).
It's important not to contaminate one grade of abrasive with another: particles of coarse abrasive on a fine polishing wheel can scratch a piece heavily.
All the fine metalworking tools must be put away in the right place (the correct drawer of the grey filing cabinet, as labelled) after use.
Consumables and Stock (to pay by use)
We keep a small amount of silver and copper stock for people to get started with (copper behaves a lot like silver, so is good for practicing). If you use any of the following, please (a) write in the fine-metalworking stock book the thing and the amount you've used, your name, and the cost, and (b) put the cost in the MakeSpace cashbox. If we're close to running out, please let the owners know. The prices below are designed to just break even, not make a profit.
If you want to buy your own stock or tools, UK suppliers include Cookson [1], Sutton Tools [2] and HS Walsh [3]. It might well be worth clubbing together with other people to get volume discounts and share shipping. Copper and brass sheet can also be found at Mackay's in Cambridge [4].
For a table of stock see Equipment/Fine metalwork bench consumables
Tools
Workholding
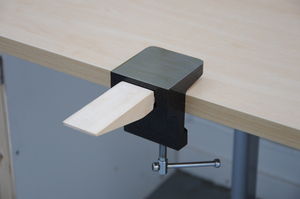
- 4*Bench Peg And Anvil (these clamp on to a bench edge, to support work) [5]
- a joint cutter [6] (a V-block with a clamp to hold fine tube, an end stop and a slot for a saw blade, for making square cuts in fine tube)
Marking out
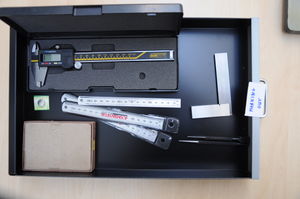
- 150mm Ruler * 3 [7]
- Standard Steel Scriber [8]
- centre punch [9]
- digital calipers (there are two calipers, a cheap axminster one [10] and a better quality one)
- 3" square [11]
Magnification
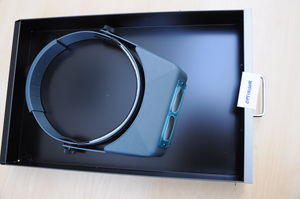
- Optivisor 2.0x No5 (NB: this is *not* eye protection)
How To: Optivisor
The Optivisor fits over your head (including over glasses if necessary); the knob on the back controls how tight it is, and those on the side control how tight the flip action is. It is *not* eye protection - the lenses are just glass, so don't use this when using the flexible shaft drill.
Files and saws
- two 6"/150mm Flat Files, Cut 2 Vallorbe
- one 6"/150mm Half-round file, Cut 2 Vallorbe
- Set Of 12 Needle Files, 16cm - All Cut2 (one has to avoid contaminating silver with iron, so we'll want separate files for ferrous metals in addition to this)
- two Grobet/vallorbe Saw Frame Adjustable [12]
- 6" Deep Adjustable Saw Frame [13];
- Vallorbe Saw Blades Grade 2/0, Bundle Of 12*12 (£30.82); Vallorbe Saw Blades Grade 6/0, Bundle Of 12 (£3.70) (those saw blades are consumables - they break easily)
- Straight 7"/17.5cm Shears (£12.54) (for brutal cutting of sheet metal. It's usually preferable to use a saw instead, to leave a square edge without bending the metal)
How To: Jeweller's Saws
These should only be used on silver, copper, or titanium, *not on steel, iron, lead, or aluminium*, otherwise silver pieces may be permanently damaged by contamination when they are soldered.
Jeweller's saws have a thin flexible blade held under tension by a saw frame.
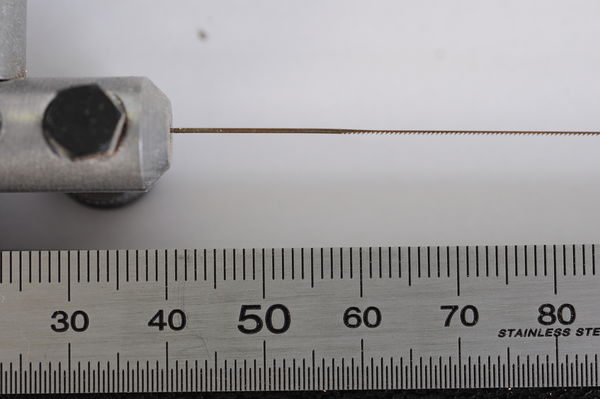
The blades come in different grades, from 4 (the coarsest) to 8/0 (the finest). In general one wants a coarse blade for cutting thick metal and a fine blade for cutting thin metal, and for tight curves. Fine blades are also more fragile.
- Grade 2/0 is a normal (medium) blade, with thickness 0.26mm, width 0.52mm, and 22 teeth per cm. The drill size for piercing is 0.55mm. These are ok for cutting metal from 0.5 to 1.0mm thick.
- Grade 6/0 is a rather fine blade, with thickness 0.18mm, width 0.35mm, and 32 teeth per cm. The drill size for piercing is 0.4mm. These are ok for cutting metal from 0.3mm to 0.5mm thick.
The saw frames have adjustable length. To fit a blade, loosen the knob that fixes the length and shorten the saw to be just shorter than a blade. Loosen the knobs at the ends that grip the blade, remove any broken blade fragments (and throw them away properly), insert the blade ends, and tighten the knobs (just finger-tight - you can strip the threads if you use too much force). The blade should be oriented with the teeth pointing towards the handle - if you run your finger (gently!) along the blade away from the handle, it should catch. Then tension the frame so that the blade rings a little when plucked, and tighten the associated knob - again, just finger-tight.
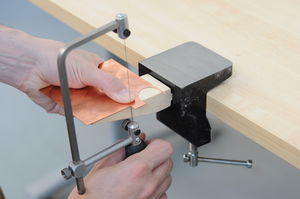
To use the saw, first arrange the workpiece (with your cutting line
marked) so that it is supported very close (within a couple of mm) to
the cut, and so that you can hold it down firmly (so it doesn't
vibrate). Usually you can put it on the edge or end of a bench peg.
Then arrange your chair so that your dominant hand and arm are in a
vertical plane, with your forearm perpendicular to the bench. The saw
cuts away from you, and usually one controls the direction of cutting
by moving the workpiece rather than moving yourself. Hold the saw
lightly with the blade vertical, and cut with an up-and-down motion.
To get a cut started, sometimes it's helpful to take a short stroke
upwards, keeping the blade in the right place with a finger next to it
or behind it. Now cut! Keep the saw vertical, and remember that it
cuts on the down-stroke. You shouldn't need to push very hard at all,
either down or forwards.
If you need to cut around a sharp corner, remember to keep cutting, otherwise the blade will break. And don't twist the saw sideways in the cut, otherwise the blade will break. And if it jams, unjam it gently, otherwise the blade will break.
To start a cut in the middle of a sheet, you need to drill a clearance hold at least as big as the size above, depending which grade blade you're using. Then thread the blade through the piece when fitting it.
How To: Jeweller's Files
These should only be used on silver, copper, or titanium, *not on steel, iron, lead, or aluminium*, otherwise silver pieces may be permanently damaged by contamination when they are soldered.
There are needle files (cut 2), two 6"/150mm Vallorbe Flat Files, and a 6"/150mm Vallorbe half-round file, also Cut 2. Files come in different finenesses; cut 2 is a medium general-purpose grade.
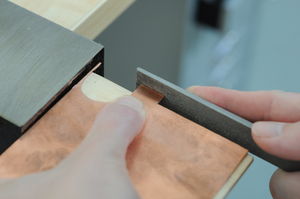
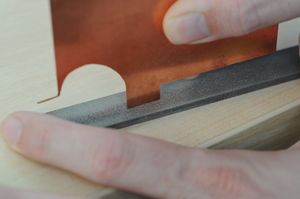
It's often useful to put the flat file on the bench, hold it in place, and move a workpiece along the file (the file cuts when the workpiece is moved towards the tang), especially when filing a straight or gentle curve saw-cut smooth. Because of this, it doesn't have a handle - but that does mean that when filing free-hand, one must be careful not to push the tang of the file into the palm of your hand, if the file suddenly becomes stuck on something.
Remember: files cut on the push stroke. On the left above, the file is being pushed (leftwards) along the metal. Dually, on the right above, the metal is being pushed rightwards along the file, towards the tang.
Filing the edge of a piece of sheet square will usually leave a tiny burr of metal along each corner of the edge, which should be removed with the file or with abrasive paper.
To make a rounded edge or corner, it's often best to first file off a small flat at 45 degrees (so one can easily control the size of the flat) and then smooth off.
How To: Abrasive Papers
These should only be used on silver, copper, or titanium, *not on steel, iron, lead, or aluminium*, otherwise silver pieces may be permanently damaged by contamination when they are soldered.
Abrasive paper comes in grades from 200 (very coarse) through to 1500 (very fine). To smooth a surface or edge, one usually wants to start from (say) grade 600 and then work down through successively finer grades. It's usually good to cuts in a particular direction for one grade, then at 90 degrees to that with the next grade until all the scratches from the preceding grade are gone. It's often useful to support the abrasive paper on the bench, moving the workpiece against it, or wrap it around a piece of wood or scrap metal.
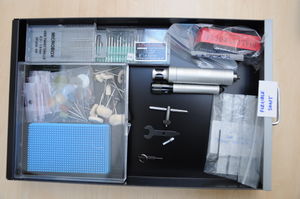
Flexible shaft drill tools
- Polishing Kit No 2 [14]
- Set Of 20 Drills 0.3-1.6mm (£15.96) (consumable) [15]
- diamond burrs (set of 30) (4.80) (consumable) [16]
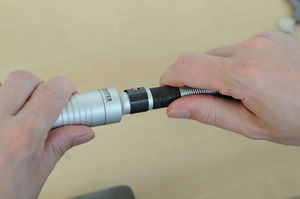
How To: Changing Handpieces
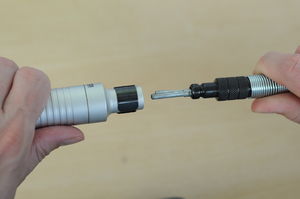
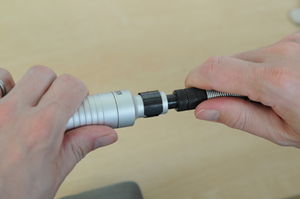
There are two handpieces: one with a chuck, for small drills, and one with a choice of two collets, for polishing tools and suchlike with standard-size shafts. To remove a handpiece, just grasp in and the knurled black part of the flexible shaft and pull apart:
To attach a handpiece to the shaft, look inside to see which way round the coupling is, turn it so that that matches the tab on the end of the flexible shaft, and push together. If it doesn't go, you may not have them precisely aligned enough.
How To: Drilling Holes in Sheet Metal
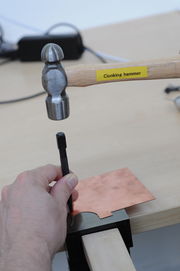
First mark out exactly where you want the hole to be, with the scriber. Then support the sheet metal on the anvil of the bench peg or on the steel bench block (not on wood, otherwise the sheet will deform too much), position the tip of the centre punch exactly on the mark, and hit it gently with the clonking hammer (not the planishing hammer, otherwise the surface of that will be ruined!) to make an indentation.
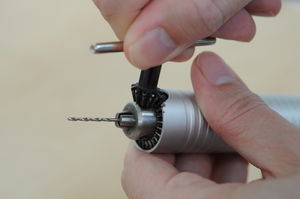
Now get the drill size you want (likely from the grey box on the counter on the right hand side of the secure workshop). You might have to clean it and to check its size with the calipers. Put it in the chuck and tighten with the chuck key.
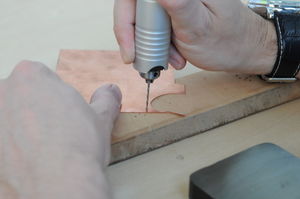
Put on eye protection, turn on the flexible shaft drill, and spin it up with the foot pedal to get a feel for it. Then support your metal on a scrap of sacrificial wood, locate the drill tip in the indentation, hold your metal to stop it rotating, and gently spin up the drill and push. How much speed and pressure to use is a matter of experience.
How To: Change collets and fix tools into the collet handpiece
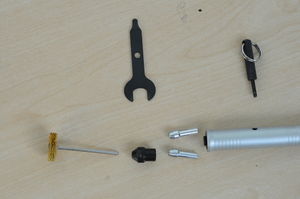
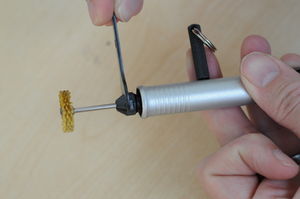
The collet handpiece has two collets, small split metal pieces with holes of particular diameters to suit burrs and wheels with 2.4 or 3.2mm shafts. They are held in by a small black threaded cone - to remove that, stop the handpiece rotating by putting the black pin through the hole in the handpiece side (you might need to rotate it to get the holes to line up) and use the little black spanner on the cone. It should be finger-tight, not tightened with all your force. Then you can change collets and refit the cone.
To fix a tool into the handpiece (assuming the right sized collet is in place already), just loosen the black cone a bit, put the tool in, and tighten.
How To: Polishing
TODO
Hammering
- Flat Stake (this is a small anvil with a machined-smooth surface on all sides) [17]
- Round triblet (for forming rings and suchlike) [18]
- Planishing Hammer (a polished-surface hammer for surface finishing and work-hardening) [19] (don't hit steel things such as punches with this)
- Rawhide mallet [20] (for hitting things without marking the surface)
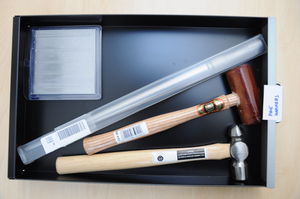
- Generic ball-pean hammer, labelled `clonking hammer' (a non-polished hammer for hitting punches etc.)
Both the flat stake (or bench block) and triblet have machined-smooth surfaces so that they don't mark any silver that one hits against them. To keep them smooth, it's important not to hit the stake or triblet directly with any steel tools.
How To: using the triblet
The triblet (or mandrel) is a long hard-steel cone, used to make rings circular. To use it, push a ring down the cone as far as it will go, then hit it all round with the rawhide mallet (pushing further down), trying to keep the face of the mallet (when it hits) parallel with the tangent plane of the cone. Doing this aggressively will also stretch the ring.
Pliers and tweezers
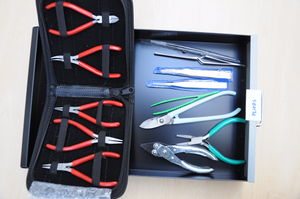
- Assorted fine pliers: a Cookson 5 Piece,115mm Pliers Set (box-jointed with smooth jaws)
- Ring Bending Pliers, Cookson Value Range
- 5.5"/ 140mm Maun Flat Pliers Parallel Action [21]
- Tweezer set [22] (brass and plastic tweezers for pickle, reverse and third-hand tweezers for soldering, fine tweezers for manipulating tiny things)
Soldering
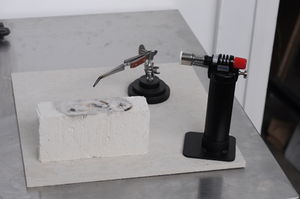
- Hand Torch [23] (for soldering or annealing small pieces, up to 10-20mm. We also have a larger torch with the glassworking kit)
- Magnesia Soldering Block [24]
- Soldering Sheet 300mm X 300mm X 9mm [25]
- Picklean Safe Pickling Powder 150g [26]
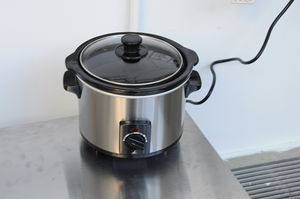
- crock pot for keeping pickle warm
- hard silver solder paste (£33.61) [27] (consumable) (this is great for small-scale work; for bigger things one wants strip solder and flux)
- solid strip solder in hard, medium, and easy grades (melt ranges 745-778°C, 720-765°C, 705-723°C)
- liquid flux [28] (kept in the small metal cupboard in the workshop) and a flux brush
How To: Using the small gas torch
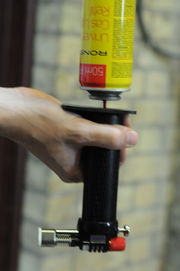
The torch is kept in the flammables cupboard in the secure workshop. To light it, open the valve on the back and push the piezo button. To turn it off, close that valve firmly (not using your full strength, though). If the torch doesn't have enough gas in, you'll need to turn it off and recharge it from the canister of lighter gas (also kept in that cupboard), by (1) going outside, (2) turning the torch and canister upside down, (3) pushing the small red tube from the canister against the valve on the bottom of the torch, and (4) letting some gas flow in.
How To: Annealing
Silver and copper (and many other metals) *work-harden*: if the metal is deformed, e.g. by bending or hammering, it gets harder (and more brittle). To soften it again it can be *annealed*: warmed up to let the crystals grow. For copper and silver, it suffices to warm them up to the point at which they just glow (in fact, that's hotter than necessary, but usually this isn't a problem). They don't need to be held at that temperature for any significant time, and they can either be left to cool naturally or dunked in water (this is simpler than steel annealing). After annealing you may need to remove any firescale, by abrasives or pickling.
How To: Soldering
Silver soldering can be used to create a strong join between two metal surfaces - normally silver, but it can also be used for joining copper, brass, and even steel (though the pickling for steel will be different). For silver, it should be possible to make an essentially invisible join.
Silver solders are high-melting-point alloys; the solder paste we have in Makespace is a silver/copper/zinc alloy with a melting point of 770 C (usually attained with a gas torch). They are not to be confused with the lead-based solders used for electronics, which have melting points less than 200 C (usually applied with a soldering iron) and do not produce a mechanically strong joint. In addition to that, they contain lead, which will contaminate your piece.
To make a good solder joint, good preparation is essential. Molten solder is very runny: it flows freely over the surface of clean metal and flows into a hot joint by capillary action, but it is very bad at filling gaps (it's not like a glue or cement). Hence, the two bits of metal to be joined have to be shaped to fit precisely, ideally with no visible gap (less than 0.1mm, perhaps) between them. They also have to be clean, with no oxide layer or grease. Freshly cut or filed silver is fine.
To keep the metal clean while it gets up to temperature, and to help the solder run, one also needs a flux. The silver solder we have is in paste form, pre-mixed with a flux, which is convenient for making small solder joints (e.g. joining the ends of a ring, attaching earring parts, or making little loops ("jump rings"). For bigger pieces one usually uses snippets of solder sheet and a separate flux (which we also have).
So:
- Prepare the two surfaces to be joined, filing and using abrasive papers as necessary to make them clean and smooth in tight contact.
- Make a clear space on the hot-working bench (the stainless steel one) with the insulated block on the 30cm square flameproof sheet.
- Make sure you've got water to hand (e.g. in the steel pot) and the pickle ready if you're going to use it.
- Find the small gas torch (see above). For larger pieces you'll need the bigger propane torch.
- Arrange things so that the pieces will be held in contact while you heat them up. Sometimes they can just be resting next to or on top of one another (on the insulated block); sometimes a piece can be bent to hold the two surfaces in contact (e.g. for a ring); sometimes it's useful to hold one in the reverse-action tweezers (attached to a third-hand base) in contact with the other resting on the block; sometimes one needs iron binding wire and more ingenuity.
- Disassemble your arrangement to apply some solder paste. This is in a syringe - it's very stiff, so you'll need to push (but pull back on the plunger when you've got enough, otherwise it will keep going). You only need a little bit (e.g. a line for a ring, or a 1mm cube for a jumpring). Alternatively use solder strip.
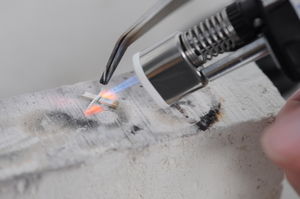
- Warm your piece up with the torch. You want to get it quickly up to temperature, otherwise the flux will all burn off too early. And you need all the metal to be hot - focus the flame first on the bulk of the piece, not on your joint (solder likes to flow towards hot). The hottest part of the flame is just in front of the blue cone.
- Watch the joint carefully (taking care not to burn yourself, point the torch at anything flammable, or inhale the fumes). When it's hot enough (a glowing orange) and the solder melts, you should see a flash of the molten silver flowing. Keep the flame there for just a moment (1s?) longer, then take it away.
- In most cases, it is not recommended to reheat if solder did not flow- oxide layer is formed on the surface and it will reduce the chance of solder sticking to metal. Exception may apply if you use ceramic flux (the expensive one).
- Let the piece cool either in the air or by picking it up with tweezers or pliers (but not the fine pliers!) and dunking it in water (watch out for splutters).
- Pickle it or use abrasives to remove any firescale.
How To: Making Jump Rings
TODO
How To: Planishing
TODO
How To: Using the Ring Mandrel
TODO
To do
- get one or two adjustable desk lamps, perhaps with magnifier
- get another file, either another 6"/150mm Flat File, Cut 2 Vallorbe or a similar half-round
- get a joint cutter, either [29] £58 from cookson or a cheap one [30] £15 from Sutton Tools.
- get some dividers
- raise the bench somewhat and fix to the wall
Gallery
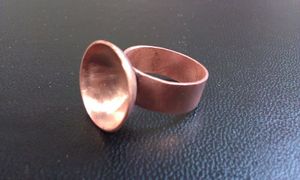
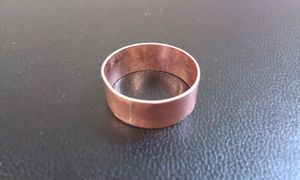
Please do add pictures of anything made using the fine metalwork tools. Here are some practice pieces from a training session (2013-05-12, AH, HW, S.):
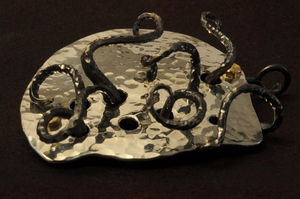
and some oxidised-silver tentacles (this is about 25x28mm):
