Difference between revisions of "Equipment/VacuumFormer"
Perfectphase (Talk | contribs) (→Heating times) |
Perfectphase (Talk | contribs) (→Health and Safety) |
||
| Line 56: | Line 56: | ||
== Health and Safety == | == Health and Safety == | ||
| + | |||
| + | Risk assessment: [[Equipment/VacuumFormer/RiskAssessment]] | ||
The Vacuum Former is a potentially dangerous piece of equipment which must only be operated by members who have received appropriate training and who take due care. The top things to always remember when using the Vacuum Former are: | The Vacuum Former is a potentially dangerous piece of equipment which must only be operated by members who have received appropriate training and who take due care. The top things to always remember when using the Vacuum Former are: | ||
Revision as of 21:37, 24 July 2013
Class Red equipment: Do not use without specific training.
(More about equipment classes)
WORK IN PROGRESS
Contents
Summary
Vacuum forming is a technique that is used to shape a variety of plastics. It is used to form/shape thin plastic, usually plastics such as; polythene and perspex. Vacuum forming is used when an unusual shape like a ‘dish’ or a box-like shape is needed.
http://www.youtube.com/watch?v=scqkjU10198
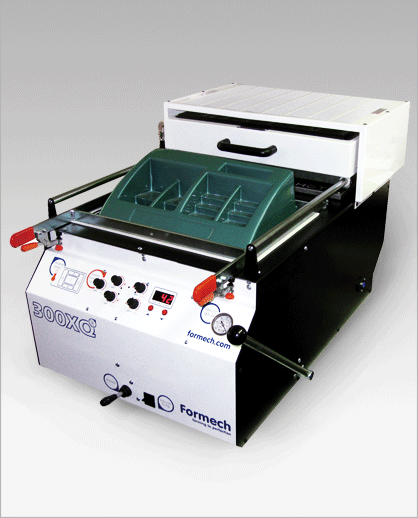
Formech 300XQ
Technical Specifications
Material size 450x300mm / 18x12" Forming area 430x280mm / 17x11" Max. depth of draw 160mm / 6.3" Max. material thickness 6mm / .25" Overall width 650mm / 25" Overall height 530mm / 20" Overall depth 970mm / 38" Weight 75kg / 165lbs
Here are some examples we've made on the Vacuum Former(please add a photo of yours any time you do a job!)
Using the Vacuum Former
Owners
The Owners are those who have volunteered to be in charge of the equipment, organising maintenance, training others to use it, and generally being a point of contact. The current Owners of the Vacuum Former are:
- Stephen Woolhead
- New owners welcomed, get in touch!
If you have any questions, problems or concerns around the Vacuum Former, please use the mailing list thread:
Training
YOU CAN ONLY USE THE VACUUM FORMER IF YOU HAVE BEEN TRAINED
and have been added to the Trained Users list by one of the Owners
To get trained on the vacuum former and be added to the qualified user list, you will need to arrange for a training session with one of the Owners.
If you'd like to arrange training, please see:
Health and Safety
Risk assessment: Equipment/VacuumFormer/RiskAssessment
The Vacuum Former is a potentially dangerous piece of equipment which must only be operated by members who have received appropriate training and who take due care. The top things to always remember when using the Vacuum Former are:
- ONLY USE THE VACUUM FORMER IF YOU ARE ON THE LIST OF TRAINED USERS
- NEVER LEAVE THE VACUUM FORMER RUNNING UNATTENDED
As a trained user, you should be very aware of the following risks and how to deal with them:
FIRE - Heating the material for too long or with the wrong settings could result in the material igniting.
ELECTRIC SHOCKS - Regular maintenance & electric survey should mean machine is safe to use. Do not use if there are any signs of damage
BURNS - Caution should be taken when using machine, ensure formed part is cool before removing. Never operate with missing or damaged safety features.
Instructions
1. First, a former is made from a material such as a soft wood. The edges or sides are shaped at an angle so that when the plastic is formed over it, the former can be removed easily.
2. The former is placed in a vacuum former at the lowest position.
3. A sheet of plastic (for example, compressed polystyrene) is clamped in position above the mould.
4. The heater is then turned on and the plastic slowly becomes soft and pliable as it heats up. The plastic can be seen to 'warp' and 'distort' as the surface expands.
5. After a few minutes the plastic is ready for ‘forming’ as it becomes very flexible.
6. The heater is turned off and the mould is moved upwards by lifting the lever until it locks in position.
7. The 'vacuum' is turned on and this pumps out all the air beneath the plastic sheet. Atmospheric pressure above the plastic sheet pushes it down on the mould. At this stage the shape of the mould can be clearly seen through the plastic sheet. When the plastic has cooled sufficiently the vacuum pump is switched off.
8. The plastic sheet is removed from the vacuum former. The sheet has the shape of the former pressed into its surface.
9. The excess plastic is trimmed so that only the plastic required remains - the completed item.
Heating times
Different materials and thickness require different heating times, here is a list that has been found to produce good results
?????
Tips & Tricks
Maintenance
The maintenance of the Vacuum Former is carried out by the Owners, with some basic maintenance being carried out by Users on every job.
Maintenance Schedule
Every job
As required, by users
Monthly
Maintenance Log
Installed on 26th July 2013. (with any luck)
Maintenance Shopping List
- Service Kit (~£50)
Further Information
Installation
Installed on 9th May 2013.
Purchase
Full Purchase, Delivery and Installation (£2500)


