Equipment/3D Printer
Class Red equipment: Do not use without specific training.
(More about equipment classes)
Contents
Introduction
3D printing is a way of creating small, custom objects from plastic filament. The printer melts the filament, held on a spool, and prints with it to create 3D structures. Makespace has two 3D printers, an UP! and a Makerbot Replicator 2X. Currently, the Makerbot is the only printer working in the space. The UP! is out of action until it can be fixed by the owners (needs new electronic components).
Owners
The Owners are those nominally in charge of the equipment, organising its maintenance, training others to use it, and generally being a point of contact.
The current Owners of the 3D printers are:
If you have any questions, problems or concerns around the 3D printer, these are the people to contact.
Trainers
The Trainers are not in charge of maintaing equipment, but have been more thoroughly instructed in its use and can train others. They may run extra classes for recently trained learners.
The current Trainers for the 3D printers are:
Training
YOU CAN ONLY USE THE 3D PRINTER IF YOU HAVE BEEN TRAINED
and have been added to the Trained Users list by one of the Owners or Trainers
To get trained on the 3D Printer and be added to the qualified user list, you will need to arrange for a training session with one of the 3D Printer Owners.
If you'd like to arrange training, please see:
Note that persons who were previously trained on the UP! are allowed to use the Makerbot after reading its manual. See https://s3.amazonaws.com/downloads.makerbot.com/replicator2x/MakerBot_Replicator_2X_User_Manual.pdf
General Health and Safety
The 3D printers are excellent tools for either making small parts, or rapid prototyping. At the same time it is an expensive tool with a (small) risk of injury and fire, so is very important you know how to use it to avoid damaging yourself and the machine. The 3D printer is a potentially dangerous piece of equipment which must only be operated by members who have received appropriate training and who take due care. The top things to always remember when using the 3D printers are:
- ONLY USE THE 3D PRINTER IF YOU HAVE READ RELEVANT SAFETY NOTES
- ONLY USE THE 3D PRINTER IF YOU HAVE READ THE INSTRUCTIONS
- NEVER LEAVE THE PRINTER RUNNING UNATTENDED
As a responsible user, you should be very aware of the following risks and how to deal with them:
HEAD CRASH - incorrect calibration could cause the nozzle to hit the platen at job start
- Calibration must be carefully checked on each startup
TRAPPING - The head and bed of the machine are moved by programs in the machine's memory.
- Be careful when near the machine, it will possibly move even if the PC is off
- Ensure you are familiar with the 'pause' and 'stop printing' functions on the Makerbot so that in an emergency you can quickly halt printing.
BURN RISK - the platen on the printers are heated, and will reach temperatures up to 253 degrees during a print run which could cause skin burns. The extrusion nozzles also get very hot. Do not touch either of these areas while printing, and keep the Makerbot's guard door securely closed while printing.
- Be careful when the machines have recently been used, as they may still be hot enough to burn.
ELECTROCUTION - as with all mains powered devices there is a small risk of danger from exposed wires. Always do a manual check that the wiring is safe, no cores are exposed or wires trapped.
Plastics used in the printers
The 3D printers can print with two different plastics, PLA and ABS. PLA has a much lower melting point than ABS, so all temperature settings for the printer need to be changed if you are switching between plastics. Normally ABS is what we would reccomend printing in: it is more durable and strong.
Telling the difference between the plastics is fairly simple: if you take a piece of the PLA filament between your fingers you can break it off and snap it easily - it is brittle. When you try to break off a piece of ABS, it bends and the filament starts to go white, not breaking straight away.
The ABS can be found on the shelves above the 3D printers, the small amount of PLA can be found in the lower down orange drawers (marked PLA).
Makerbot Replicator 2X 3D Printer
This is the Makerbot Replicator 2X, currently the only 3D printer working in the space. There is a dedicated PC next to it with the MakerWare software used to drive it. MakerWare can import STL design files (eg. from Thingiverse) for printing. The manual for this printer can be found here: https://s3.amazonaws.com/downloads.makerbot.com/replicator2x/MakerBot_Replicator_2X_User_Manual.pdf
Specific Safety Tips
There is a burn hazard from the nozzles and the heated platter, as mentioned above. The Makerbot will display its current temperatures for you if you use the arrow keys to navigate on its small display (see manual). The platter may also move unexpextedly. Do not open the front hatch or lift off the top transparent cover during printing. ABS fumes over a long period may be harmful - if you feel light-headed take a break in a well ventillated area.
Don't let the machine run unattended - you don't need to watch a print constantly but keep an eye on it and always remain in the same room. Possible problems that would require you to pause or stop the machine include filament getting wrapped around the spool holder at the back and sticking, and a software crash on the PC. If you're unsure of a situation you can always pause your print and restart it.
Always switch the printer off at the back when you are finished.
Avoiding Damage to the Machine
The bed is covered with Kapton tape. This green, shiny tape is very fragile and expensive to replace and so you MUST NOT use a knife, scraper or other sharp object to remove your finished models. Use your hands only, or the plastic scraper with the Makerbot logo on in the red box as a last resort. Often, models will easily come free once the bed is allowed to cool, so give it 10 minutes and try again before resorting to this.
The kapton tape needs to be kept clean so that plastic extruded onto it has a nice base finish and sticks well. If you notice smears or marks on the tape give it a gentle clean with a dry cloth from the red box on the shelf. Make sure your hands are clean and not greasy before you touch the platen or try to remove printed objects from it.
If you do damage the tape, please let the owners know as soon as possible. Chris Voth's email address is on the little orange sign on the machine.
Using SD cards with the Makerbot
We would recommend driving the Makerbot directly from the dedicated software on the PC next to it. If you want to use an SD card, it is very fussy. SD cards have to be PHYSICALLY 2GB or smaller (formatting a big card small doesn't work). They also have to be formatted in FAT16 (mostly Linux machines do this most easily). There is a small card formatted this way, currently in the slot of the printer free to use. It's labelled "MAKESPACE"; please don't absent-mindedly take it away! The SD card should contain .thing files to print from.
Loading and Unloading
You will notice there are two print heads for this printer, driven by two separate spools of plastic on different axles.
When you want to change spools, either to change colour or because a spool has nearly run out, follow these instructions:
 different axles for different spools
 spool from under reel
 beware of wrapping round axle
 colours (no need to run out all because test strip does that)
 setting PLA/ABS
 cut off lump
printing
 preheating
 if model stuck, wait to cool
 keep an eye on it. can go strange half way
levelling
 not often needed
 symptoms of unlevelness
   first layer too thin or varying thickness
   part not sticking
   worst case: head touching bed
 be careful not to damage kapton
software/workflow (it is proposed that the course should not include detailed introduction to the software, as this is mostly obvious, can freely be downloaded, and is well documented)
 scaffolding
 setting colours
multicolour
 can't do scaffolding and multicolour - not true anymore
 issues with mixed materials
other stuff
 strength characteristics
 don't use fine
 don't leave the room
 paying
Using the UP! 3D Printer
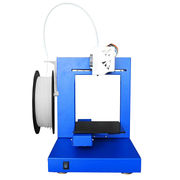
This is the UP! (a slightly older version of the device currently available). The dedicated PC next to the printers is running win7 and UP! software. It can import STL design files from Google sketchup. At the moment the UP! is out of action.
Instructions
To use the printer you must familiarise yourself with the safety notes above and read the following instructions.
Power Up
- Give the machine a quick visual check. Make sure that there is nothing left on the platen. Remove the platen support piece from under the platen and gently lower it. Check the new material is feeding OK and the reel has enough on it
- Turn on the machine at the wall socket
- Initialise the machine - Open the 'Up!' software on the attached PC and double-click the software icon. Once it has loaded select '3D Print > Initialise' from the toolbar
Check calibration
This operation must be carried out to ensure the bed is level and has the height correct.
- Firstly find the current value of the nozzle height in the print dialog. This is only accessible once you have a design loaded, so load a model in (there should always be some in the '3D Printer Training' folder on the desktop) and then select 'Print' from the toolbar
- Note the printhead height from this dialog (currently 139.1) and press cancel to abort
- Go to the maintenance dialog (3D Print > Maintenance from toolbar) and set the head height to 20mm less than this height. Enter the value in the edit box and press 'To:' button
- Then move the bed closer to the expected value, in decreasing steps, until you reach the set height or the nozzle is going to hit the bed. If you reach the specified height (currently 139.1mm) there should just about be room to get a piece of paper between the nozzle and the bed.
- Once this has been checked you should drop the head to about '100' and then repeat the check at two other corners and the centre. When the platen is well below the head you can quickly go to the other locations using the FL/FR/NL/NR/Center buttons on the maintenance dialog
Load your Design
- Import your model - press the 'Open' icon on the ribbon bar
- Check the placing and size of your model - the printer software is quite clever, but it may not choose the best orientation of complex shapes. You want the largest flat surface on the bottom, so that less support material is required.
Download to the Printer
- When you are ready to print you can just press the 'Print' button on the ribbon bar
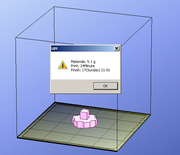
- Some calculations now take place and a popup box will appear with an estimate of how much material will be required as well as how long printing will take - please check 3D Printer Material Cost table and put your money in the honesty box
Worried whether there's enough filament left for your job? As a rule of thumb, one turn of the material drum is about 1g of material. - If you are happy then make a note of the material weight and check the cost against the table below
- Press 'OK' to proceed
- Watch the magic happen ...
DO NOT EVER LEAVE THE PRINTER UNATTENDED
Finishing
- When the part is finished the printer will make several beeps - but of course you will be watching so you will be expecting that
- DO NOT TOUCH THE PLATEN YET ! It is usually very hot, and it is best to give it a few minutes at least
- When it has cooled a little then with care you can peel the part away from the platen
- The 'raft' which was built to produce the part on should then separate with a little effort, and possibly careful peeling with a blade
Power Down
- Lower the platen to its rest position before turning off. Do this from the maintenance dialog (3D Print > Maintenance from the toolbar) and press 'To Bottom'
- Turn off the printer on the wall socket
- Gently lift the platen and put the platen support piece back underneath
- Shut down the PC and double check that everything is left in a safe and clean state for the next user
Cost
Currently we charge 10 pence per gram for prints, this is to cover the cost of material plus a little for wear and tear and other consumables. You can weigh printed parts using the scales next to the blue honesty box. Please put your money into the blue labelled honesty box on the shelf above the printer.
Maintenance
The maintenance of the 3D printer is carried out by the Owners, with some basic maintenance being carried out by Users on every job.
Maintenance Schedule
Continuous Maintenance (Every job, done by all 3D Printer Users)
- Clean the platen of any plastic remnants
- Check the new material is feeding OK and the reel has enough on it
Basic Maintenance (Every week, done by 3D Printer Maintainers)
- Check the security and condition of all cabling
- Check the UP! platen coating and re-paint any areas if necessary (green paint is in a pot with the printer)
Full Maintenance (Every 4 weeks, done by 3D Printer Maintainers)
- Tasks as per Basic Maintenance, plus
- Strip coating off UP! platen and re-paint with a fresh coat
- Calibration check, if issues have been reported
Maintenance Log
Reactive Maintenance
- None
Regular Maintenance
- Week Number, Date, Type, Owner (Notes)
2013
- Week 08, February 18, Simon Stirley (Re-painted holes in platen coating)
- Week 09, February 25,
- Week 10, March 4,
- Week 11, March 11, Simon Stirley (checked wiring, posted safety notice, re-painted platen holes)
- Week 12, March 18,
- Week 13, March 25,
- Week 14, April 1,
Maintenance Shopping List
- TBD
Further Information
Manual
The manual is installed in the machine attached to the printer and also available here: Manual
Repairs
We expect to have to change the following parts for general maintenance:
- TBD
Maintenance and Spares:
- One UK supplier of consumables is Cool Components
Software
You can download Quickstart manual and latest driver software from pp3dp.
- Google SketchUp with STL plugin as below
- This plugin seems to work quite well. Use 'File/Export to DXF or STL' from Sketchup once you have installed it and select 'STL' as the last item in the type list when asked
- NetFabb repairs any incomplete STL files
- Meshlab is a good free program (Sourceforge) for visualising and modifying STL files
- OpenSCAD is a script-based modeller ('3D compiler'), well-suited for technical CAD (less so for artistic design)


