Difference between revisions of "Equipment/CNC Router"
Perfectphase (Talk | contribs) (→Router Bits) |
Perfectphase (Talk | contribs) (→Router Bits) |
||
| Line 146: | Line 146: | ||
<div style="background:#FADADD; border:1px solid #FFC0CB; padding:5px"> | <div style="background:#FADADD; border:1px solid #FFC0CB; padding:5px"> | ||
| − | NEVER USE ROUTER BITS THAT HAVE BEARINGS. These types of cutters are designed for manual routers where you can feel the feed back of the bearing in contact with the material being cut. A CNC device as no such feedback and will press the bearing into the material has hard as it can until something gives, i.e. the cutter breaks or much worse the spindle breaks. People found using these types of cutters on the CNC router will be BANNED! Just use the version without the bearing. | + | <b>NEVER USE ROUTER BITS THAT HAVE BEARINGS.</b> These types of cutters are designed for manual routers where you can feel the feed back of the bearing in contact with the material being cut. A CNC device as no such feedback and will press the bearing into the material has hard as it can until something gives, i.e. the cutter breaks or much worse the spindle breaks. People found using these types of cutters on the CNC router will be BANNED! Just use the version without the bearing. |
<gallery> | <gallery> | ||
Revision as of 23:01, 13 August 2013
Class Red equipment: Do not use without specific training.
(More about equipment classes)
Contents
Summary
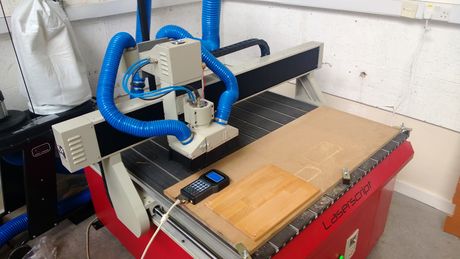
A CNC router is a computer controlled shaping machine. These are related to the hand held router. Instead of hand held routing, the tool paths can be controlled via computer numerical control. It is a computer-controlled machine for cutting various hard materials, such as wood, composites, aluminum, steel, plastics, and foams. It is one of many kinds of tools that have CNC variants. A CNC router is very similar in concept to a CNC milling machine. The CNC router is controlled by a computer. Coordinates are uploaded into the machine controller from a separate CAD program
- Capacity: 1200 x 1200 x 120mm
- Rate (X,Y): 6000mm/min (Max) 5000mm/min (Working)
- Rate (Z): 30mm/sec
- Spindle Speed: 4500 to 24000rpm
- Mechanical Precision: 0.01mm
- Spindle Power: 1.5KW Variable Speed, Water-cooled
- Blade Diameter: min 3.175mm, max 12.7mm
- Order Format: HPGL, G code, u00, mmg, plt
- Control System: DSP with USB connection
Here are some examples we've made on the CNC router (please add a photo of yours any time you do a job!)
Using the CNC Router
Owners
The Owners are those who have volunteered to be in charge of the equipment, organising maintenance, training others to use it, and generally being a point of contact. The current Owners of the CNC Router are:
- Stephen Woolhead
- Chris Abri
- Mark Mellors
- Dave Ansell
- David Bebb
- Simon Stirley
If you have any questions, problems or concerns around the CNC router, please use the mailing list thread:
Training
YOU CAN ONLY USE THE CNC ROUTER IF YOU HAVE BEEN TRAINED
and have been added to the Trained Users list by one of the Owners
To get trained on the CNC router and be added to the qualified user list, you will need to arrange for a training session with one of the Owners.
If you'd like to arrange training, please see:
Health and Safety
The CNC Router is a potentially dangerous piece of equipment which must only be operated by members who have received appropriate training and who take due care. The top things to always remember when using the CNC Router are:
- ONLY USE THE CNC ROUTER IF YOU ARE ON THE LIST OF TRAINED USERS
- NEVER LEAVE THE CNC ROUTER RUNNING UNATTENDED
As a trained user, you should be very aware of the following risks and how to deal with them:
FIRE - Cutting with the wrong settings could result in the material igniting.
TRAPPING - Stand clear of the machine while in motion.
DUST - Ensure extraction system is working.
NOISE - Ensure that you wear the correct PPE when working with the machine for prolonged periods.
Instructions
Setting the Z Origin Using the Z0 Sensor
A tool that has an extremely narrow tip may break when it touches the tool sensor depending on which tool is to be used.
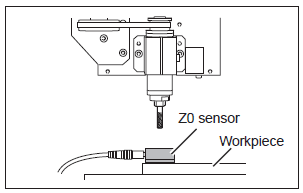
1. Secure the workpiece on the bed, and place the Z0 sensor at the place where you want to set the Z origin on the workpiece. Face the surface of the Z0 sensor without the magnet facing upward.
2. Use the handset to move the tool to the position above the sensor.
3. On the handset press OK + 8(Z-0). The tool slowly descend until it contacts the sensor. When the tool rises and stops, the setting operation is complete.
Note: It is important the tool is electrically conductive from tip to shaft, and the sensor is clean. Failure to check will cause damage to the tool and sensor.
4. Remove the sensor from the workpiece to a location where it will not interfere with future cutting operations.
Software
The standard software is Vectric's line of CAM software:
VCarvePro
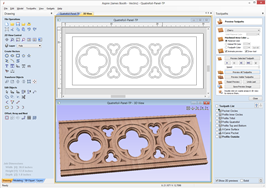
VCarve Pro provides a powerful but intuitive software solution for 2D design and calculation of 2D and 2.5D toolpaths for cutting parts on a CNC Router.
The software can import 2D designs from other programs but also includes a full set of drawing and editing tools with advanced layout options such as True-Shape Nesting. The toolpath options cover all typical 2D routing operations such as Profiling, Pocketing, Auto-Inlays and Drilling as well as 2.5D strategies such as V-Carving, Prism carving, Fluting and even a decorative Texturing strategy. Each toolpath includes appropriate options to customize the settings and provide a high level of control for different types of operation. In addition all toolpaths can be previewed to show just how the part will look when it is actually cut, this allows instant feedback to allow toolpaths to be further optimized.
Details: http://www.vectric.com/products/vcarve-pro.htm
Training Resources: http://support.vectric.com/training-material/vcarve-pro
Cut3D
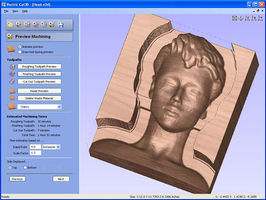
Cut3D is a dedicated toolpath engine for CNC machining 3D models that have been designed using a 3D CAD or Graphics design product such as AutoCAD, Rhino3D, 3D Studio etc. or scanned using a laser or touch probe device. Cut3D's exceptionally easy to use interface leads you step-by-step through the process of loading a model, setting the size, interactively placing tabs to hold the job in place, calculating single, double or four sided roughing and finishing toolpaths, previewing the results and finally saving the CNC code to run on your machine.
3D Models that are too large / thick to machine because of gantry height, cutter length or limited material thickness can be 'Sliced' into separate pieces. Each slice can then be machined and the complete job assembled.
Details: http://www.vectric.com/products/cut3d.html
Training Resources: http://support.vectric.com/training-material/cut3d
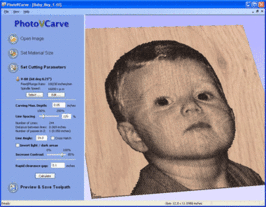
PhotoVCarve
PhotoVCarve creates lines of grooves that vary in width and depth to represent the detail in a photograph or image. The quality of the finished result is very dependant upon a high level of contrast between the material surface and the machined grooves. This information is very important to remember when cutting designs using the PhotoVCarve software.
PhotoVCarve machines dark areas in a photograph with wide groove and the lighter areas to have narrower ones. The software automatically calculates the toolpaths based on the cutter selected and maximum depth of groove required.
Details: http://www.vectric.com/products/photovcarve.html
Training Resources: http://support.vectric.com/training-material/photovcarve
Tooling
Router Bits
Router bits (or cutters) are the most common type of cutter, they have two or more vertical cutting edges. These are good general purpose cutters that can be found in most DIY shops. The are the same type that you would use in a manual hand held router.
It is important to notice that the cutters are on the edge of the body only, they do not extend to the centre of the cutter. This means the cutter CAN NOT BE USED AS A DRILL. An holes that are made by these sorts of cutters must be made by ramping the cutter to the correct depth in a sloping or spiral motion.
NEVER USE ROUTER BITS THAT HAVE BEARINGS. These types of cutters are designed for manual routers where you can feel the feed back of the bearing in contact with the material being cut. A CNC device as no such feedback and will press the bearing into the material has hard as it can until something gives, i.e. the cutter breaks or much worse the spindle breaks. People found using these types of cutters on the CNC router will be BANNED! Just use the version without the bearing.
The cutting edges should always be the lowest part of the cutter.
End mills
Up Cut and Down Cut
Router end mills have two variants, up cut (left) and down cut (right); there is a third type, compression, but they are quite rare.
Most cutters are up cut, which have the cutting service on the top of the flutes and as they rotate lift the chips up and away from the material being cut.
Down cut cutters have the cutting edge on the bottom of the flutes and push chips down towards the material being cut. This has the advantage of pressing the material being cut into the bed of the machine; this is especially useful for thin plastics. The other advantage is the top surface shows far less breakout and splintering, this is a big advantage for materials like laminates.
On image on the left has been cut with an up-cut end mill and the image on the right a down-cut.
NOTE: There is a very big disadvantage to down cut end mills, and that is that they do not clear there chips effectively in blind holes. This means they need larger ramping moves to get to the correct cutting depth and if used in pockets without enough clearance, the friction can lead to burning or melting of the material being cut.
Another down side to down-cut cutters, is that when cutting pockets, the bottom surface will not be as clean as that made with an up-cut cutter, which will do a far better job of clearing the waste chips that rub between the cutter and the material with a down-cut.
Stock Tooling
In order to keep a small stock of cutters for general use, the CNC Router needs to have a means of generating money. Because there is no material provided for use with the CNC Router there is no way to bring in any funds for such things. Therefore, we ask that if you use one of the communal cutters please put 50p into the CNC Router Honesty Box. This will go towards funding for replenishing stock and also for the replacement of the sacrificial bed once it gets worn out.
There will likely be 1 or two of each of the following cutters available for use, however please do not count on this being the case:
- 2.5mm square cutter - single flute
- 1/8" square cutter - single flute
- 1/8" ball cutter - 2 flute
- 6mm square cutter - 2 flute
- 6mm ball cutter - 2 flute
- engraver 0.2 30deg 1/8" 30mm length (8 of)
- engraver 0.8 30deg 1/8" 30mm length (2 of)
- 22mm 2 flute straight
- 90deg x 32mm VBit
Some Suppliers are listed below:
Feeds & Speeds
What are feeds and speeds? Why are they important?
Milling machine tutorial - cutter selection, speeds and feeds
The phrase speeds and feeds (or feeds and speeds) refers to two separate velocities in machine tool practice, cutting speed and feed rate. They are often considered as a pair because of their combined effect on the cutting process. Each, however, can also be considered and analyzed in its own right.
Cutting speed (also called surface speed or simply speed) is the speed difference (relative velocity) between the cutting tool and the surface of the workpiece it is operating on. It is expressed in units of distance along the workpiece surface per unit of time, typically surface feet per minute (sfm) or meters per minute (m/min). Feed rate (also often styled as a solid compound, feedrate, or called simply feed) is the relative velocity at which the cutter is advanced along the workpiece; its vector is perpendicular to the vector of cutting speed. Feed rate units depend on the motion of the tool and workpiece; when the workpiece rotates (e.g., in turning and boring), the units are almost always distance per spindle revolution (inches per revolution [in/rev or ipr] or millimeters per revolution [mm/rev]). When the workpiece does not rotate (e.g., in milling), the units are typically distance per time (inches per minute [in/min or ipm] or millimeters per minute [mm/min]), although distance per revolution or per cutter tooth are also sometimes used.
Spindle speed quick reference
| 400Hz | 350Hz | 300Hz | 250Hz | 200Hz | 150Hz | |
|---|---|---|---|---|---|---|
| RPM | 24000 | 21000 | 18000 | 15000 | 12000 | 9000 |
Feed rate quick reference
| 100% | 75% | 66% | 50% | 33% | 25% |
|---|---|---|---|---|---|
| 6000 | 4500 | 3960 | 3000 | 1980 | 1500 |
| 5000 | 3750 | 3300 | 2500 | 1650 | 1250 |
| 4000 | 3000 | 2640 | 2000 | 1320 | 1000 |
| 3000 | 2250 | 1980 | 1500 | 990 | 750 |
| 2500 | 1875 | 1650 | 1250 | 825 | 625 |
| 2000 | 1500 | 1320 | 1000 | 660 | 500 |
| 1500 | 1125 | 990 | 750 | 495 | 375 |
| 1000 | 750 | 660 | 500 | 330 | 250 |
| 500 | 375 | 330 | 250 | 165 | 125 |
Sample feed rates
For working out feeds and speeds, recommend http://www.cnccookbook.com/CCGWizard.
The feeds and speeds below have been tested on our machine. The 3mm cutters were single flute carbide. 2 flute HSS cutters may require different settings to avoid breakages.
| MDF | 3mm deep | 6mm deep | 12mm deep |
|---|---|---|---|
| 3mm | 3000/24Krpm | 3000/24Krpm | 3000/24Krpm |
| 6mm | 3000/15Krpm | 2000/13Krpm | 1500/11Krpm |
| 22mm | 3000/5000rpm | 3000/5000rpm | 1500/4Krpm |
| Plywood | 3mm deep | 6mm deep | 12mm deep |
|---|---|---|---|
| 3mm | 2000/24Krpm | 2000/24Krpm | 2000/24Krpm |
| 6mm | 3000/15Krpm | 1500/15Krpm | 1000/11Krpm |
| 22mm | 3000/5Krpm | 3000/5Krpm | 1500/4Krpm |
Tips & Tricks
Maintenance
The maintenance of the CNC Router is carried out by the Owners, with some basic maintenance being carried out by Users on every job.
Maintenance Schedule
Every job
- Vacuum cutting dust from bed and around machine
- Sand down high points created on sacrificial bed by cutting/screwing
As required, by users
- Empty extraction bin
Monthly
- Inspect extraction hoses for splits/ wear
- Clean and oil guide rails
- Check level and condition of cooling water and replace as necessary
- Inspect sacrificial bed, re-skim or replace as required
Maintenance Log
Installed on 9th May 2013.
3/7/13: Lower spindle clamp bolts replaced with longer stainless ones, holes through tapped as original ones had stripped.
Maintenance Shopping List
- Cutters
- Sacrificial Bed (1.2m x 1.2m 12mm MDF)
Further Information
Installation
Installed on 9th May 2013.
Purchase
Full Purchase, Delivery and Installation (£?????)
